Tuesday, May 5, 2009

"I'll take EASY Jeopardy templates for $500, Alex!"

Have you ever used PowerPoint to make a Jeopardy review game for your students? If you have, you know that it can be a pretty involved process...lots of slides...lots of hyperlinking...lots of time...Unless your pretty adept at PowerPoint, it can get frustrating.

Well, I came across a solution that might just make your day.


What is it?

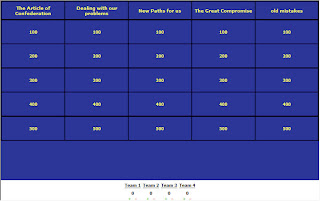
Jeopardy Labs is a website that lets you create your own Jeopardy templates online...QUICKLY!


How do I do it?
  1. Go to the Jeopardy Labs website.
  2. Click on "Start Building".
  3. Create a password to protect your Jeopardy template (so that others can't edit it)
  4. Enter a title for your game, as well as answer categories.
  5. Click on the question boxes to enter answers.
  6. Save your template, get the web address, and you're ready to play!

Here's a screenshot of a finished Jeopardy template:


Anything else I should know?

  • Jeopardy Labs is completely web-based, so everything you make will be stored on their website.
  • When you're finished with your game, you will receive 2 URLs (web addresses). One is used to play the game. The other is used to edit your template (so you can build your game in multiple sessions).
  • You can search other peoples' finished templates. Just click "Browse" on the website and enter a topic you're looking for. Try this before you make your game--it might save you even more time!
  • The template lets you select up to 8 teams and keep score (add or subtract points) for each of them while you're playing the game.
  • It is possible to insert pictures into the question boxes, BUT you need to have some HTML knowledge. I would just stick to text...
  • There is no "Double Jeopardy" or "Final Jeopardy" built in to the game, so you'll have to do that on your own outside of the template.
  • Take a minute to read the "About" page on the site. It will thoroughly answer questions that you still might have.

How can I use it in my classroom?

Jeopardy Labs does not require users to create an account and login! Why is that good news? Well, instead of creating a bunch of Jeopardy games yourself, why don't you have your students do it? We're approaching the end of the school year, and I'm sure many of you are gearing to review for final exams. Wouldn't it be beneficial to your students if they were the ones to lead some of the review sessions? You could assign topics to different groups and have them use Jeopardy Labs to create a game to review! It would save you time and help them review the curriculum.

Please let me know if I can help your class with Jeopardy Labs!

Good Luck!

Chris

Wednesday, April 29, 2009

Sick of PowerPoint? Try Prezi!


What is it?

Prezi is a very cool and fairly new free online presentation tool that (for me) has been a very refreshing (and much needed) alternative to PowerPoint. According to the website, Prezi allows anyone who can sketch an idea on a napkin to create and perform stunning non-linear presentations with relations, zooming into details, and adjusting to the time left without the need to skip slides. And, it looks great when it's finished!

PowerPoint presentations are typically "linear", meaning that viewing one means that you'll look at one slide, move to the next, and so on. I'm sure we've all seen great PowerPoint presentations...and we've seen examples that aren't so great. It's painful to sit through a presentation in which the speaker puts an unreasonable amount of text on the screen. Or, worse yet--when the presenter reads the text for you from the presentation! Where's the excitement with that? How is that engaging? As far as I'm concerned, it's virtually impossible to make a boring Prezi presentation.

How does Prezi work?
Instead of creating individual slides with information, Prezi gives you a "space" that allows you to insert text, pictures, and movies--literally jumping and zooming from one to the next. It really lends itself well to presentations that are created to encourage discussion or to highlight a few important points. Check out this Prezi tutorial that lets you try it to see how it works.


How can I use it in my classroom?
Obviously, if you're looking for a different way to present and engage your students, Prezi is perfect (A Prezi looks great on a SMART Board). I would suggest that you select a topic and give yourself a few days or weeks to create your Prezi presentation--just so you can get used to things. Prezi doesn't offer "teacher/student" account access, so if you'd like your students to use Prezi, they'd have to create their own individual accounts.

Anything else I should know?
  • Prezi is completely web-based, so you'll have to connect to the Internet to create and view presentations. Although, it is possible to download your own presentations when they're finished (you can't download other users' presentations, but you can view them)
  • The free Prezi account inlcludes 100mb of storage space (more than enough) and publishes finished Prezi presentations to their "Showcase". You should check out the Showcase to get ideas.
  • I would highly suggest that you check out the "Learn" page at Prezi.com before you begin working. It will make things easier. It took me a while to get used to the editing and viewing controls that Prezi uses, but it was well worth it.
  • Prezi is a European company, so you may notice a few language differences on some of its pages.
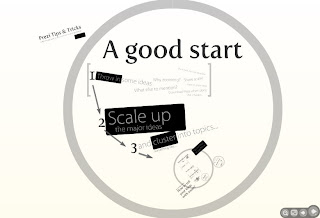
  • Here's another Prezi with some tips and tricks

Please let me know if you'd like my help using Prezi!

Good Luck!

Chris

Wednesday, April 22, 2009

Create Talking Avatars with Voki

What are Avatars?

Avatars are computer users' visual repsresentations of themselves. Many Web 2.0 sites ask registrants to upload photos of themselves when they create their profiles...although it's really not a great idea to post pictures of yourself publically anywhere on the web. Avatars are great alternatives--it's a picture of you, but it's not really you! (If you have ever played a Nintendo Wii, you've made an avatar. It's the character you use to play the game).


Voki is a website that allows users to create 3-dimensional avatars...that talk! It has some great features that allow users to design their own character (or browse through their premade avatars that include politicians, celebrities, creatures, aliens, characters, dogs, and cats!). Once you've created your character, you can give it a voice in one of 4 ways: using your cell phone, recording directly to the website with microphone, typing text that Voki will turn into speech, or uploading an audio file from your computer.

Social Studies teacher Mike Varney contacted me recently about a project idea he had that incorporated Voki. During his unit about the Vietnam War, Mike asked each of his students to write a speech as a “Dove” or “Hawk” stating whether they support The War. The students were asked to write from a first-person point of view and to provide reasons to support their opinions. However, instead of having the students recite the speeches in front of their peers, he helped them create avatars (digital representations of their War character) to “give the speeches for them”. Using Voki, Mike helped his students create their characters and record their speeches. The results were outstanding…and very entertaining. Check this one out:


What Else Should I know?
  • Voki is a free website, but it does require that users create accounts and register an e-mail address. Because Mr. Varney's students don't have school e-mail accounts, we used MailCatch to create enough accounts for each of the students to use.
  • There is a 60 second time limit for recording, so keep the narration short and sweet!
  • When they are finished, Voki avatars are embeddable. Mike's students embedded their avatars on his classroom website.
  • The entire project took 2 class periods: one to create the avatars, and one to record the speeches. It was definitely a quick project.

Please let me know if you'd like to try Voki with your students!

Good Luck!

Chris

Friday, April 3, 2009

Check Out the New Google Earth


Google recently released its newest version of one of my favorite tech tools: Google Earth. This new release (Version 5) looks and works very similiarly to previous GE versions, but it includes some pretty cool new features:


  • A New "Ocean" Layer: Now you can fly underwater to learn about expeditions, shipwrecks, and marine life. (I don't think the underwater graphics are amazing, but I'm sure they will improve.)

  • Travel to Mars: Previous versions allowed you to explore Earth and Space, but now you can visit The Red Planet to see satellite and Rover images. There are some excellent guided tours located within the "Mars Gallery" layer.

  • View Changes Over Time: Use the new "historical imagery" feature to view how locations have changed throughout the last several decades--a great way to check out our impact on the environment.

  • Record Your Tour: We have always had the ability to create, save, and share "Placemarker" tours in Google Earth. Now, we have the ability to record narration, which gives students the ability to talk their way through their tours.

You can click on any of the titles above to see a short description of the feature. Or, click here to watch an overview of Google Earth 5.0.

5th Grade Teacher Nicole Enny recently attended an after school professional development class about Google Earth. She had been using the volcano layer in GE to teach her students about The Ring of Fire. After attending the class and learning about some of its new features, Nicole decided that she wanted her students to create a tour of different types of volcanoes around the world. She also wanted her students to record and narrate their tours so that they could be shared back in her classroom. Click here to watch one of their completed tours.

*Please note: You will need Google Earth Version 5 in order to watch the tour. Not sure if you have Version 5? You probably don't. Click here to download the newest version.

Here are some other awesome Google Earth resource pages:

Please let me know if you'd like my help with creating your own Google Earth Tour!

Chris

Friday, March 20, 2009

Make Your Own Google Custom Search


We all know how a typical Google search works with students. They tell Google what they want it to search for. They click on the first result. There is too much text or it's too difficult to read. They click on the next result. It has nothing to do with what they're looking for. They raise their hand and tell you that they can't find any information.
Sound familiar? There are few ways to solve this problem:
  1. Teach your students how to use Google (or let me show them how). A Google Advanced Search is very powerful.
  2. OR, make a (free!) Google Custom Search with your own list of websites and show your students how to use it.
What is it?

A Google Custom Search is just what it sounds like. It's a Google search that you can customize. Basically, instead of Google searching the entire Internet, you tell it to search specific websites that you have previewed and approved. A Custom Search looks like and works like a typical Google search, but it's faster, safer, and more useful to your students. Click here to see a Google Custom Search I made recently for a 6th grade social studies class. They were studying Greek and Roman Gods and Goddesses and a lot of the Internet material they were finding was too difficult or inappropriate. So, I found 8 kid-friendly websites and made a Custom Search for them to use. It made research much faster! Try it out! Search for your favorite God or Goddess!


How do I make a Google Custom Search?

  1. You (the teacher) find useful, safe, and appropriate websites that are at your students' readability level.

  2. Create a Google Account (unless you already have one).
  3. Go to the Google Custom Search Homepage and follow the steps. You'll have to provide some information about your search, but it's not a lengthy process.

  4. Paste the URLs (addresses) of the sites you want the Custom Search to search.

  5. Eventually, you'll be given a URL for your search. Create a link for it on your classroom webpage and you're all set! Custom searches are also embeddable!

Please let me know if you'd like some help setting up a Google Custom Search!

Good Luck!

Chris

Thursday, February 12, 2009

Check Out Animoto: It's like PhotoStory with a Sugar High!


What is it?

Animoto is a very unique Web 2.o tool that creates professional looking "music video-like" movies with photos that you upload from your computer. Simply upload photos, select music from Animoto's library (or upload your own), and Animoto does the rest. In a matter of minutes, it analyzes your music and animates your photos accordingly...very cool and very easy.

Here's the best part: Animoto is generously offering free all-access passes to educators! This means that you can create individual accounts for your students and that they can make full-length, downloadable videos. (Typical users would have to pay for these features)

Now, I know what you're probably thinking: "This sounds an awful lot like PhotoStory." Well, it is similar, but I think it's different enough to deserve a look. Keep reading to see how some 5th graders compared Animoto to PhotoStory.

5th grade teacher Renee DeBlock approached me a few weeks ago with an idea for a media project. She wanted her students to create commercials about cities in Canada as part of their social studies curriculum. Animoto was the perfect tool! ALL of her students did an outstanding job and produced amazing results. Click here to watch one of the commercials.


How we did it:

  1. We decided to give her students the option to choose either PhotoStory or Animoto for their project. Neither one of us has used Animoto with a class before, so we weren't exactly sure how it was going to go. And some kids hadn't used PhotoStory yet, so we wanted to give them that opportunity. I think that it's importatnt offer choices to students, too. Does every student's final product have to look the same? Isn't it more interesting for everyone if they don't?
  2. When we started the project, we wanted the students to have a clear idea of what their responsibilities were and what each choice would involve. I created and showed them a sample PhotoStory and Animoto about Halifax, Nova Scotia. I used the same pictures, the same music, and the same script for both because I wanted them to focus on how these 2 things were similar and different--not necessarily on the content I used to make it. When they were done watching both, we filled out a Venn Diagram comparing Animoto and PhotoStory. Here's what they came up with (we used a SMARTBoard and I converted the handwriting to typed text):

  3. The biggest difference between the 2 programs was that PhotoStory allows you to have "more control" over your movie. In other words, you can record narration for individual pictures, but you can't really do that with Animoto. It basically makes your pictures move to the beat of your music.

  4. Renee's students used the Venn to help them make their choice. Amazingly, half of them picked Animoto and half picked PhotoStory.

  5. We spent the next few class periods researching, filling out graphic organizers, finding pictures, and writing scripts for the projects.

  6. When the time came to put everything together and start building the movies, Renee instructed the PhotoStory group and I instructed the Animoto group.
  7. The students who chose Animoto had to record their script using Audacity (free audio recording and editing software), search for and download background music from FreePlayMusic.com, and then turn both of these things into an mp3 that would later be uploaded as their Animoto "music".

Notes about the project:

  • The entire project (not counting information and photo research, and scriptwriting) took about 4 class periods.

  • Completing an Animoto project took no longer than completing a PhotoStory project. In fact, both groups finished on the same day!

  • All Animoto movies are downloadable and embeddable (with the special educator access). Renee embedded her Animoto projects on her classroom webpage. Not only does it look good, but it's a great way to share the projects with the community.

Anything else I should know?

  • When you register for an educators' account, Animoto will send you an e-mail with link. You must use that link to create individual (or group) accounts for students. Renee and I used GMail (Google's e-mail) to create student accounts because they have a very cool trick. Here are directions from the Animoto site:


  • If you're going to use pictures from the Internet, make sure you take a few minutes to teach your students about copyright and fair use. They shouldn't be taking pictures from the Internet without giving credit.

Take a few minutes to visit Animoto and create a movie. You'll see how easy it is to make very professional looking digital stories in no time at all.


Please let me know if I can help you and your students with an Animoto project!

Good Luck!

Chris

Monday, February 2, 2009

Quickly Zoom Into Any Screen on Your Computer

Many of you probably remember David Warlick, the speaker who visited our campus last May to talk about 21st Century education. While he had many things to say about the new ways that students learn, one of the things that intrigued a lot of us was his ability to zoom in and out of certain portions of his screen. Many people have asked me how he was able to do that, and the simple reason is because he was using a Mac Computer (I believe it's a built-in Apple feature).


Other than looking very cool, I thought that a feature like this would benefit Queensbury teachers because of the plasma monitors that are in every classroom. Sometimes you want to use them to show your students something, but it's a little tricky for them to make out the detail on the webpage or in the document. So, I set out to find a solution...


That's when I came across ZoomIt. It's a free, downloadable program that you can install on your classroom computer in minutes.


Here are a few screenshots so that you can see what the program does:


It allows you to zoom into the screen:


It allows you to draw on any screen:


To install ZoomIt, follow the steps in this video that I made. It's not that tricky, although you might want to watch it twice before you try--just to make sure it makes sense.


If you're still stuck, send me an e-mail and I'll get it set up for you.


Good Luck!


Chris